Hosting a WordPress website on the Web servers offered by the hosting
companies or installed on your local computer is pretty much easy but
what about the Android smartphone. We all know, nowadays the smartphones
are enough powerful to handle Linux applications, nevertheless, the
thing which refraining us from doing such stuff like creating a web
server (Apache, MySQL, PHP,
PHPMyAdmin) on the Android devices is the lack of stable resources. However, developers keep working on stuff to make others to have a complete benefit of their Android smartphone. There are some Android web server apps present on the Google Play store those are enough powerful to convert your Android device (smartphone or Tablet) into a full-fledged web server. Here in this tutorial, we let you know how to install and host WordPress on Android Web server using Ksweb app for the testing purpose.
Overview of steps needs to install Android Web server and WordPress on it.
Host WordPress CMS on Android Web server tutorial in detail with screenshots:
How to access the installed WordPress CMS or Android web server from your Computer (PC)
To access the Android server or WordPress website from your PC, either it should be connected to the same Wifi your phone is on or simply ON the hotspot of your smartphone and connect PC with it. It is because your smartphone and PC should be on the same network to communicate with each other locally.
Now go to the Setting menu-> About -> Status and IP Address.
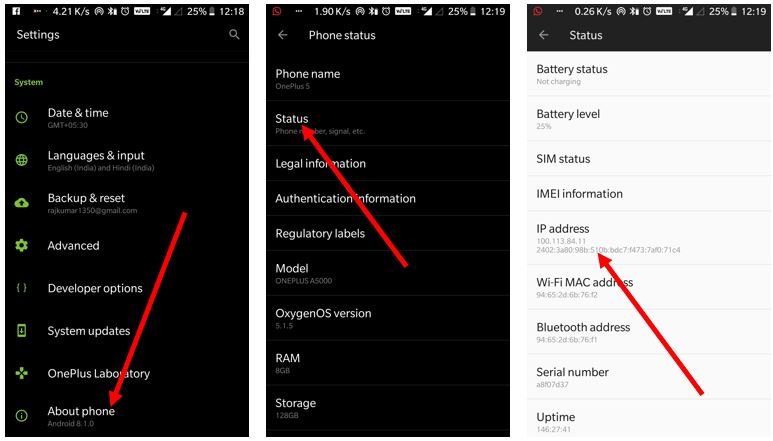
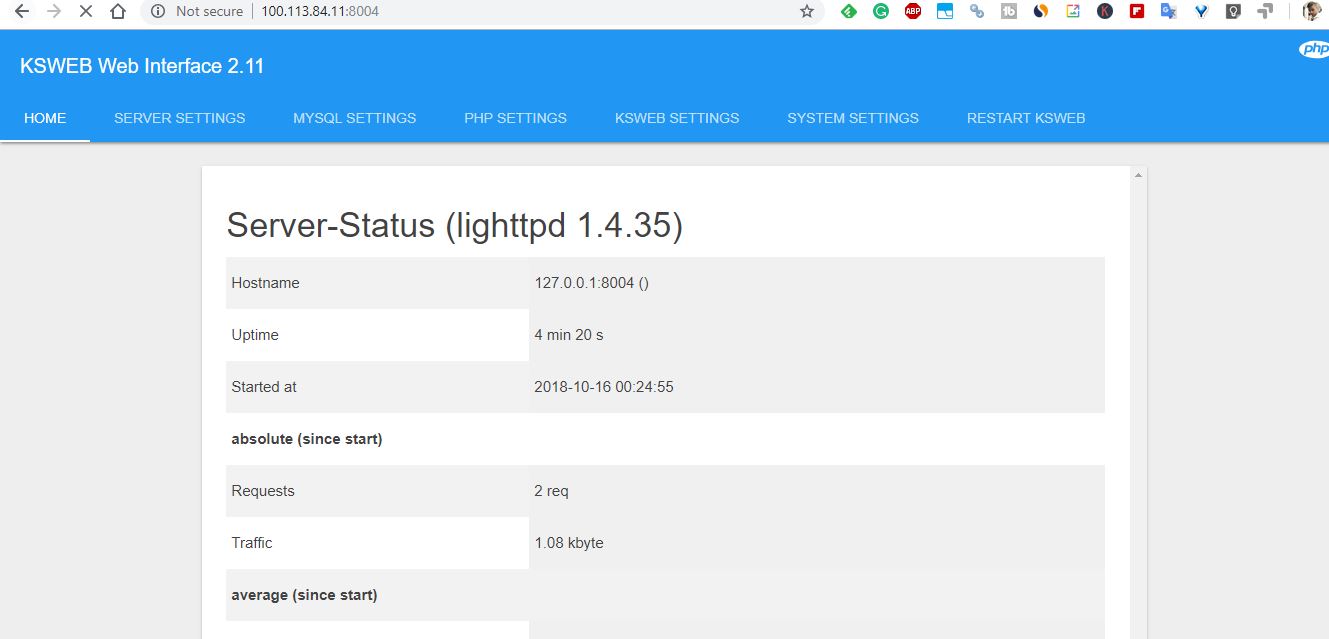
Go to your PC browser and type your IP there along with the port number. For example, mine IP address is 100.113.84.11 so along with port number it will be 100.113.84.11:8000. That’s it enter IP address along with the server port you want to access.
PHPMyAdmin) on the Android devices is the lack of stable resources. However, developers keep working on stuff to make others to have a complete benefit of their Android smartphone. There are some Android web server apps present on the Google Play store those are enough powerful to convert your Android device (smartphone or Tablet) into a full-fledged web server. Here in this tutorial, we let you know how to install and host WordPress on Android Web server using Ksweb app for the testing purpose.
Overview of steps needs to install Android Web server and WordPress on it.
- Go to Google Play store and search for KSWEB.
- Install the KSWEB server which comes with Lighttpd server, Nginx, Apache, PHP, MySQL, msmtp, Web Interface, KSWEBFTP, Editor and Scheduler.
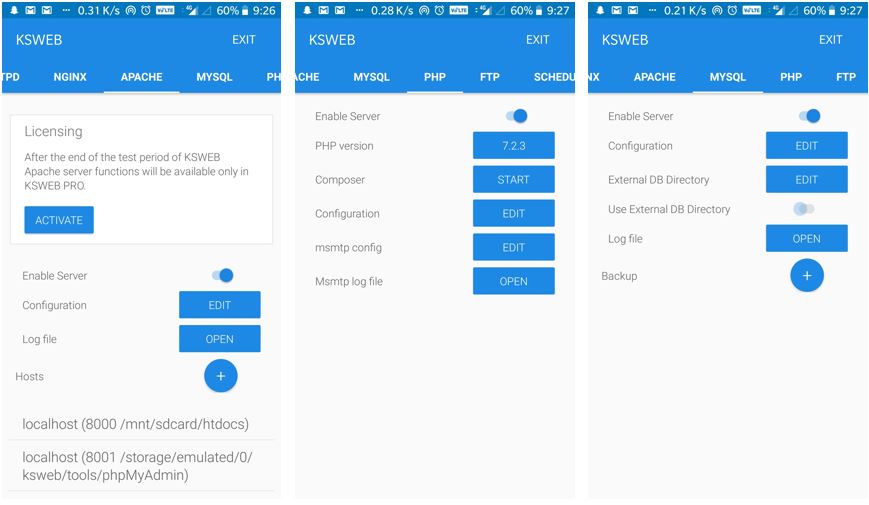
- Open the KSWEB Android Web server app and enable the Apache web server, PHP and MYSQL.
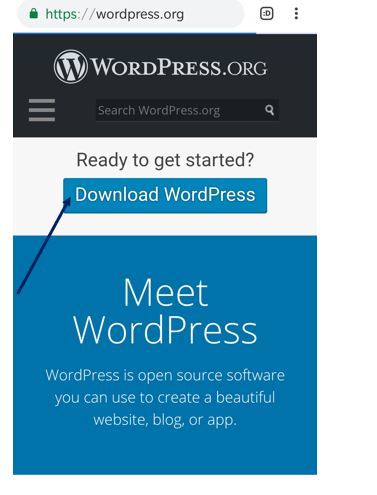
- Go to WordPress.org and download the WordPress CMS files.
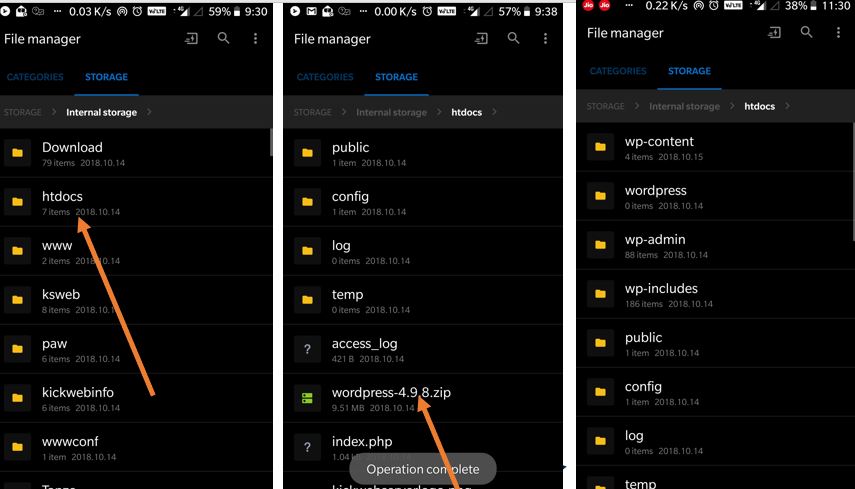
- Now open the file manager move the WordPress.zip folder to htdocs and extract it there.
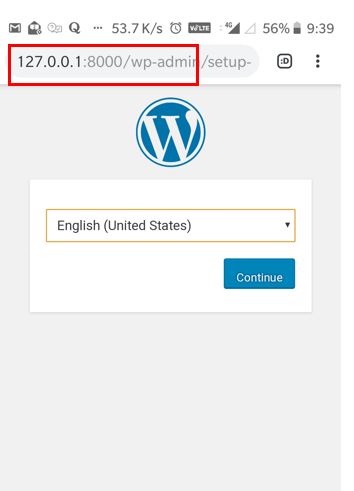
- Make sure the KWSweb is running in the background. Go to the browser and point to 127.0.0.1:8000/wp-admin.
- Follow the rest of the process of the guided WordPress CMS interface.
Step 1: KSWEB Android web server app installation.
The KSWEB app is available on Google Play store that enables the user to use Lighttpd server, Nginx, Apache webservers along the PHP and MySQL. It is premium app comes with 5 days trial. So, you can try it and if you like its functions and features then you could go for the premium which cost $3.99 for KSWEB pro version and $2.99 for KSWEB standard; not much costly. Here is the Link to download the KSWEB APP.Step 2: KSWEB App Enable Web server
After downloading and installing the KSWEB App the next step is, which web server you want to use for WordPress CMS. While the Trial version only the Lighttpd and Apache servers are available to use whereas the Nginx is only available to use in premium versions. So, enable both Lighthttpd and Apache.
Step 3: Enable the MySQL, PHP, and FTP.
Step 4: Create a Database for WordPress using PHPMyAdmin on Android
-
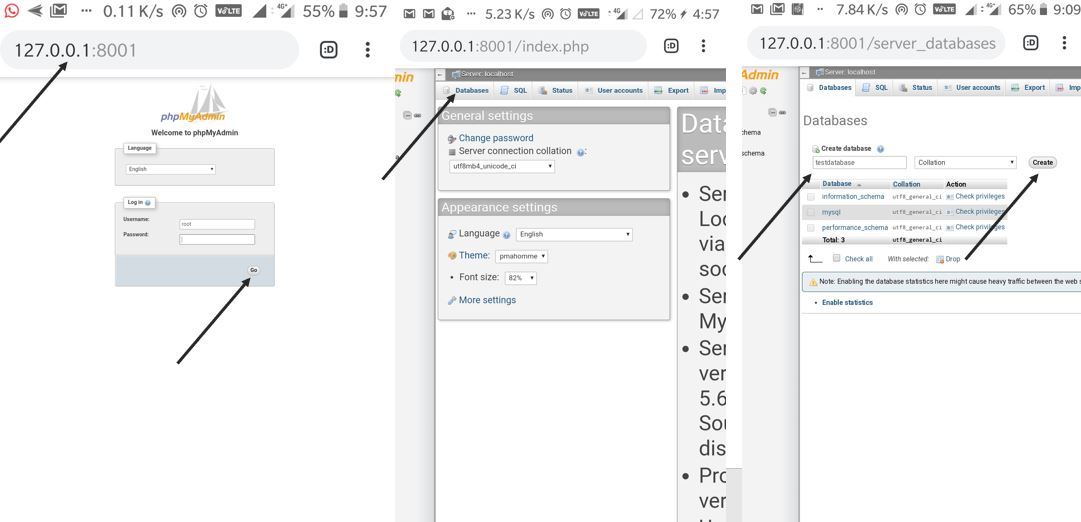
- Go to Tools tab and tap on the PHPMyAdmin option select the Apache. It
will ask to choose the browser( If you did not set any default). Once
you select the browser, the PHPMyAdmin will open. Use the username-root and left password column blank and tap on GO.
Credentials detials

MySQL host: localhost (or 127.0.0.1)
MySQL port: 3306
MySQL login "root" with a blank password
- Tap on the Database option from the menu of the PHPMyAdmin. Type some name for your Database, for example, here we have given testdatabase. After giving the name to your database tap on the Create button.
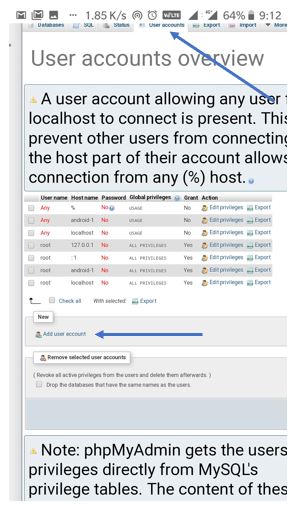
- After the above step tap on the option “User Account” and then Tap on the Add user Account option.
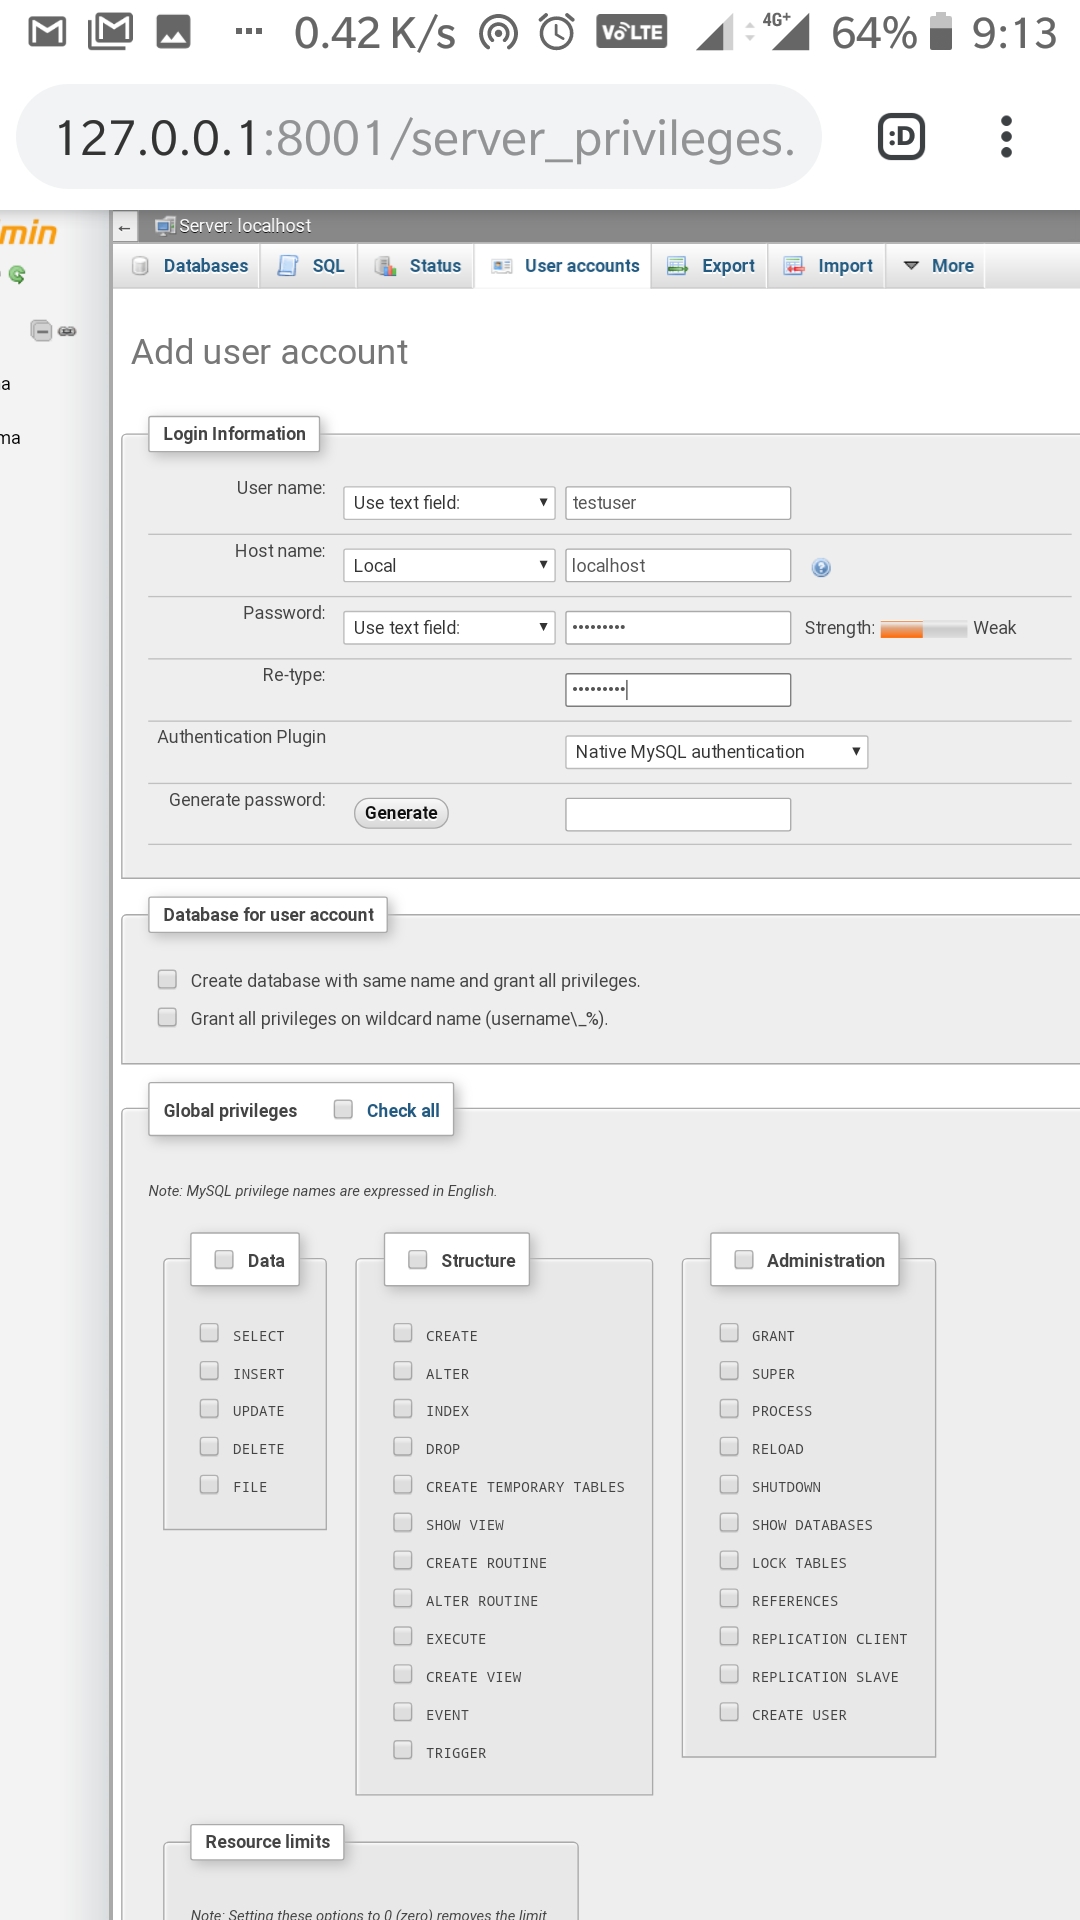
- Give some username, select hostname Local and assign some password to your new account and then scroll down and tap on the GO button.
- Now again go to the User Accounts tab from the menu of PHPMyAdmin and select your newly created database and then tap on the “Edit Privileges“.
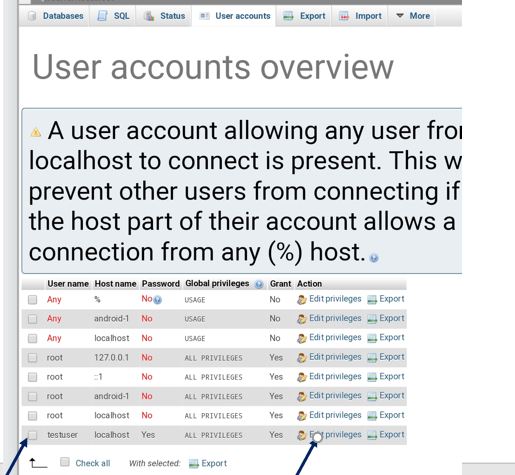
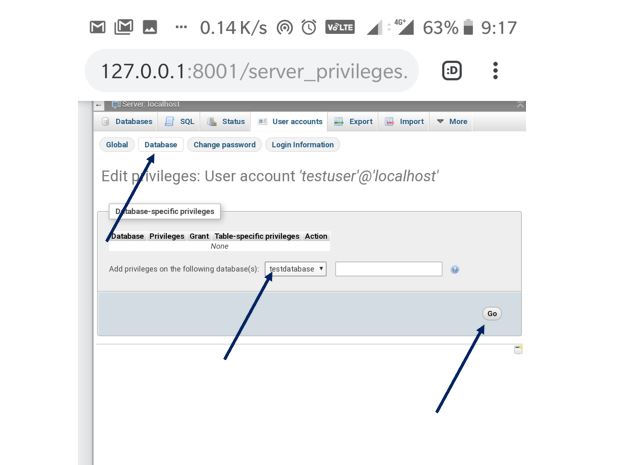
- Under the User Account option tap on the Database and select your
newly created database to assign the user to it and then tap on the GO button.
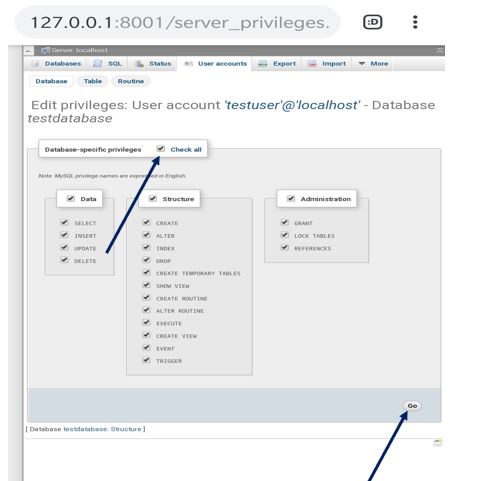
- Select the Grant All option and then tap on the GO button.
- Go to Tools tab and tap on the PHPMyAdmin option select the Apache. It
will ask to choose the browser( If you did not set any default). Once
you select the browser, the PHPMyAdmin will open. Use the username-root and left password column blank and tap on GO.
Step 5: Download the WordPress
Go to WordPress.org and Download the WordPress.zip file on your smartphone. Here is the link.
Step 6: Extract the WordPress Zip File
One the WordPress.zip file downloaded. Go to your smartphone File manager-> Download folder-> select the WordPress.Zip folder and move it to the htdocs folder. And there in the htdocs folder extract all folder and files of the WordPress.zip.
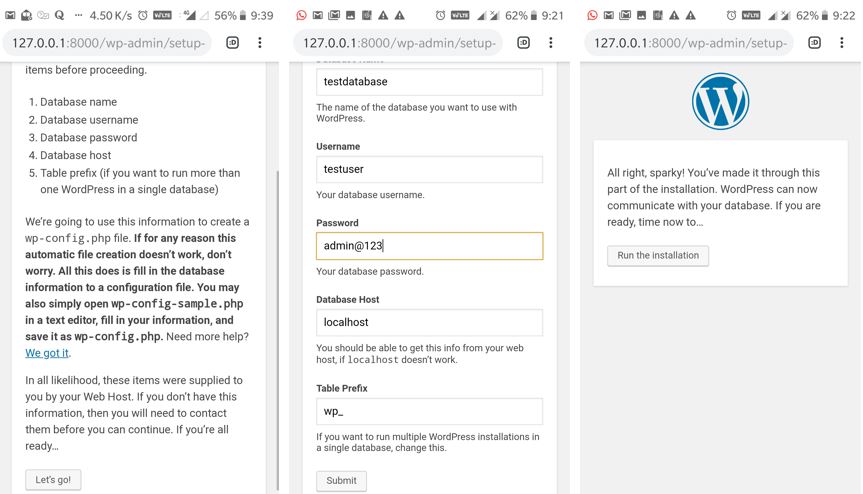
Step 7: Setup WordPress on Android Web server using KSweb.
Make sure your KSWEB App web server is working in the background. Now, go to the browser and type 127.0.0.1:8000/wp-admin. You will get the WordPress setup screen.
Step 8: Provide the Database information
Enter the database information which we created above in PHPMyAdmin. And then tap on the Run installation button.
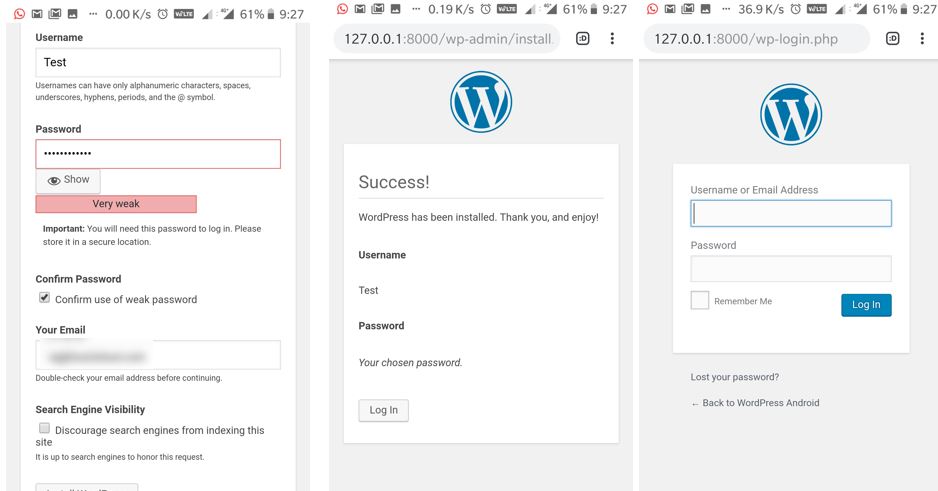
Step 9: Create the Admin account and Login to WordPress
Setup the WordPress admin account and click on the Install WordPress. After the installation, it will ask to login. Enter the username and password you have just created and tap on the login button.
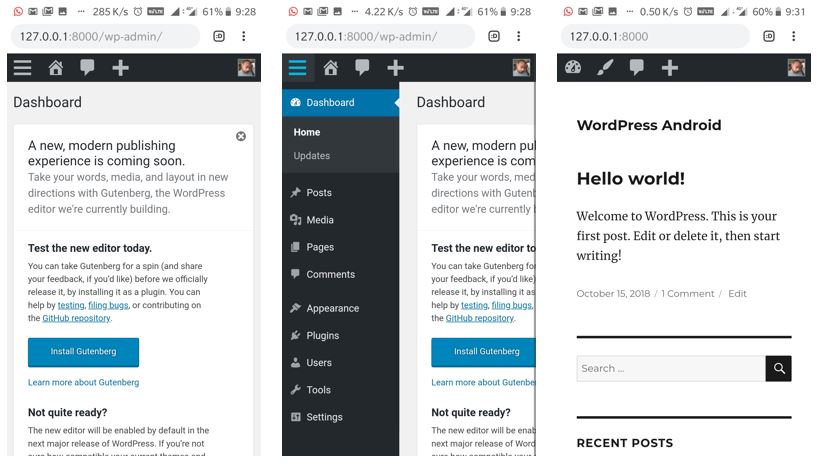
Step 10: WordPress Dashboard
Now finally you will see your Android web server installed with WordPress CMS.
How to access the installed WordPress CMS or Android web server from your Computer (PC)
To access the Android server or WordPress website from your PC, either it should be connected to the same Wifi your phone is on or simply ON the hotspot of your smartphone and connect PC with it. It is because your smartphone and PC should be on the same network to communicate with each other locally.

Go to your PC browser and type your IP there along with the port number. For example, mine IP address is 100.113.84.11 so along with port number it will be 100.113.84.11:8000. That’s it enter IP address along with the server port you want to access.

No comments:
Post a Comment